- 18-04-2023
- Hanubindh Krishna
- Mulesoft
-
Share


While MuleSoft takes pride in using a streamlined and largely intuitive approach to automation, integration, and APIs, we hope you'll agree that a helpful guide is always good to have on hand for even the most technically competent developers.
For users seeking to test Mule applications and APIs before deployment, MUnit - a native testing framework for Mule integrated into MuleSoft Anypoint Studio - is the answer.
The unit and integration testing tool enables companies to perform detailed, automated unit and functional tests in their local environment or their continuous integration and continuous delivery (CI/CD) settings.
The following guide will cover the capabilities and how-to's of MUnit in greater detail but also aims to arm you with some tips and best practices to help you make the most of the software.
Introducing MUnit
MUnit is a Mule application testing framework that allows you to build automated tests for your integrations and APIs quickly. It provides a full suite of integration and unit test capabilities and is fully integrated with Maven and Surefire for integration with your continuous deployment environment.
With MUnit, users can:
- Design and test Mule apps and APIs, graphically or in XML, all within Anypoint Studio.
- Integrate testing into your existing CI/CD process more efficiently.
Enabling companies to perform more detailed, automated tests on APIs and applications.
Understanding The Anatomy Of Munit
The critical components of MUnit testing are the MUnit tests themselves. A single MUnit suite represents a series of grouped MUnit tests, which means that when the MUnit suite itself is run, all of the MUnit tests that it comprises are executed.
To make that execution happen, MUnit covers severalscopes, which are used to define how MUnit execution takes place.
Let's explore these areas of scope in more detail.
Munit Execution Scopes And Sub-scopes
Before Suite Scope
This is a self-explanatory MUnit test scope. The Before Suite Scope runs once while the test suite is being executed but before the actual tests are run.
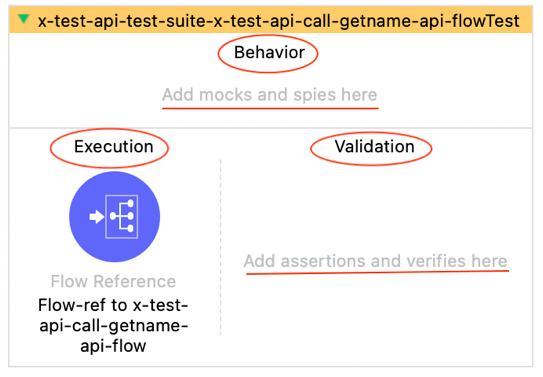
Test Scope
The MUnit Test Scope, as the name suggests, is where the actual test execution takes place. However, the MUnit Test scope is comprised of three sub-scopes, as follows:
Behavior:
Where the behaviors themselves are to be defined. For example, the components a user intends to mock are defined under the Behaviour sub-scope.
Execution:
Where the developer defines execution logic. This sub-scope is where the required events are defined, and the actual flow that will be tested is fully referenced.
Validation:
Where the test conditions that identify a successful test execution are defined; for instance, verify call components and assertions are invoked within this sub-scope.
After Test Scope
Within MUnit, the After Test scope executes any time a test itself is performed – but naturally, it only does so after the test itself has finished running.
After Suite Scope
This is the final scope within the broader MUnit execution framework. When every test has been executed, and the test suite has likewise been completed, the After Suite scope comes into play.
'At A Glance Guide To Munit Components
MUnit has been designed to be as comprehensive as possible and with a wide variety of components that a developer can use to help unit testing go as smoothly as possible.
Understanding these components is the key to making the most of MUnit. To do so, it's first necessary to understand that MUnit components are categorized under two subsections – MUnit and MUnit Tools.
Let's explore each of these components in more depth.
The Munit Components Module
The components found here are as follows:
| # | Component Name | Description |
|---|---|---|
| 1. | Set Event | They're used whenever you need to set a new Mule Event in your test flow. Aspects such as the payload, test event attributes, and error contingencies can be established using Set Event. |
| 2. | Set Null Payload | Exactly as it sounds, this is how you set a null payload within a test flow. |
| 3. | Before Suite Scope | An execution that runs one time only, before other tests are run, and is often used for pre-test tasks such as a setup function. |
| 4. | Before Test Scope | Similar to the above, except it runs before each MUnit test within the suite, rather than only once in the entire suite. Remember, a suite is where multiple tests are stored within MUnit. |
| 5. | After Suite Scope | Most often used for a teardown after the tests are completed, the After Suite scope runs once before the tests are run. |
| 6. | After Test Scope | For anything to be run once after each test within the broader MUnit test suite. |
| 7. | Test Scope | The MUnit test flow functionality itself. |
The MUnit tools components module
Compared with the MUnit components defined above, MUnit tools are more useful when you need to refine, tinker with or fine-tune your MUnit testing experience.
While several MUnit tools are within this module, having a solid working knowledge of the most frequently used is a bright idea.
| # | Component Name | Description |
|---|---|---|
| 1. | Assert equals / Assert expression / Assert that / Run Custom | These are all Assert Components used to help validate and refine the expected outcome a user expects of their flow. This can be useful in payload validation, for example. |
| 2. | Fail | Set up similarly to Assert Components and conditions, yet can be defined to execute without any conditions. Fail always delivers a failure outcome with an assertion message, and the component invocation shall always result in an assertion error. |
| 3. | Mock when | A component designed to help the user mock Mule components. This eliminates any need for external dependencies, meaning greater attention and focus can be honed on the testing processes. For instance, by mocking an external API connection request, the conditions of the software are satisfied without that API request having to occur – which saves time and resources. |
| 4. | Verify Call | This component enables you to assert and verify whether a given component has been successfully invoked or not. This is especially useful in error scenarios, as users can use Verify Call to establish whether or not the flow reference to the error handler has been invoked, as one example. |
| 5. | Spy | A valuable tool for users seeking to validate any changes made to a component both before and after the call. For instance, if you need to define if a transform component has its variable correctly defined during its call, Spy can help by distinguishing to users whether a variable stored as null before the call has correctly changed to the expected value to be stored after the call. |
What you need to know about MUnit features
MUnit has been designed to be easy to pick up, efficient in helping you accomplish better unit testing, and packed with features designed to put the power into your hands.
Of course, doing so means having complete familiarity and confidence with MUnit's features – as well as an understanding of how to make them work best for you.
Let's explore these features in greater depth.
Anypoint Studio integration
MUnit is well integrated into the broader Anypoint Studio ecosystem. Users can easily access MUnit, its components, and its functionality through their Anypoint Studio pellets. This has been expressly designed to take advantage of intuitive drag-and-drop functionality. You can move MUnit components as required, making creating unit testing flows easy and streamlined.
The Anypoint Studio MUnit components palette
Whenever you select an MUnit test flow, the Mule Palette in Anypoint Studio automatically populates with both MUnit and MUnit tools components.
This makes getting to work much quicker, and lets you easily refine your testing processes.
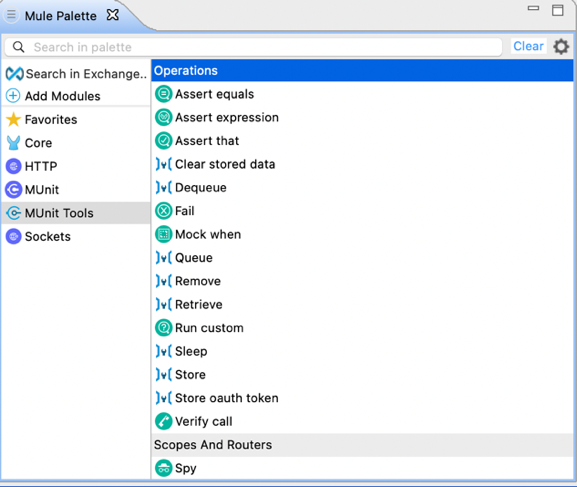
Figure 2 Munit tools components
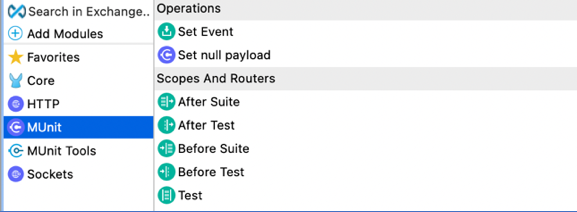
Figure 3 Munit components
Enriched MUnit test views via Anypoint Studio
So much of what makes good development better is finding ways to make the technical elements of the job easier on the eyes. When MUnit tests are run, regular development views are enhanced using Anypoint Studio to be fuller and more enriched.
Anypoint Studio accomplishes this by using an intuitive UI that lets you see the success of your testing executions at a glance. For example, the Mule flow view gives all successful tests a green tick icon.
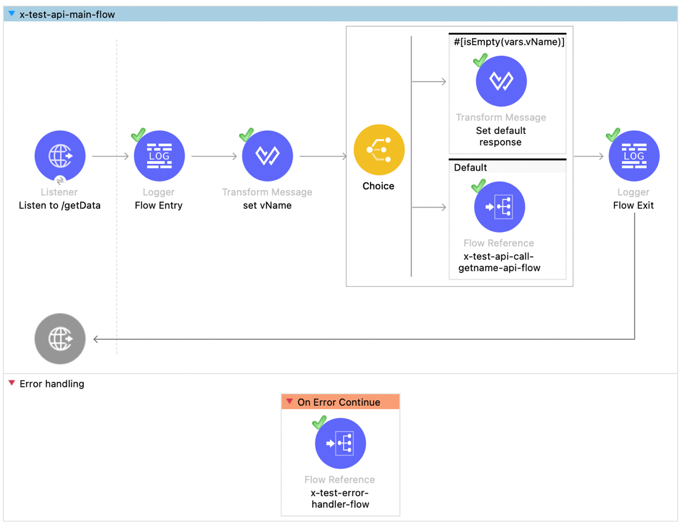
Figure 4 Mule flow view enriched with Munit coverage
There are also ways for developers to view, manage, execute, and analyze the results of the executions being run better.
The MUnit execution view
Within MUnit, users can enjoy an interface that balances visual appeal with need-to-know details. For example, the Run view clearly shows both how many tests have run, as well as how many of them have proven successful.
Tests are listed, and you can order them by Suite Name or the Default setting as required – useful for when you need to sift through a great deal of data.
Green Mule icons demonstrate suites that have shown success, whereas those with failed states, such as failed assertion, have their Mule icons greyed out. This helps you hone in faster on where the problems or mistakes are cropping up.
Meanwhile, a red Mule icon signals users that a more severe error has occurred that has stopped suites from effectively executing. This can be down to several factors, such as issues or errors in the DataWeave expressions.
Naturally, you can expand suites to see their constituent tests within this interface, helping you fine-tune your troubleshooting.
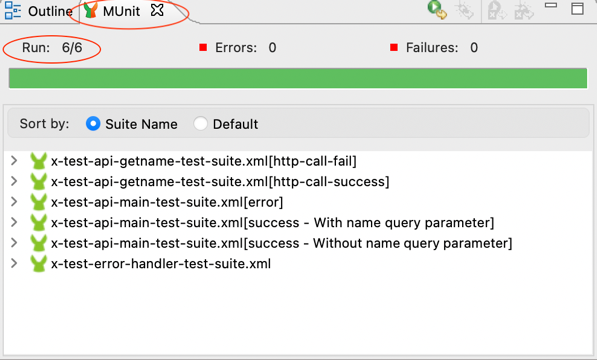
Figure 5 Munit execution view
The MUnit errors interface
As the name suggests, all errors encountered during MUnit testing operations are collated here. Having them centralized in this way helps better identify where the biggest problems in need of fixing are.
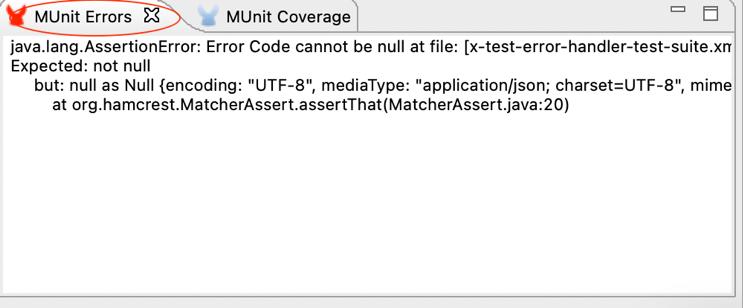
Figure 6 Munit errors view
The MUnit coverage interface
From this interface, you can see a broad breakdown of the coverage of both MUnit overall and individual MUnit suites within your current workflow.
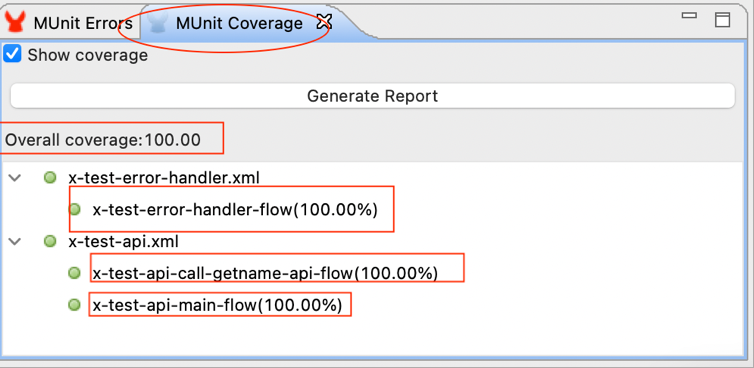
Figure 7 Munit coverage view
MUnit integration with Apache Maven
Developers can use the MUnit Maven plugin to perform MUnit unit testing runs during their builds. MUnit coverage reports can be generated and exported in numerous file types, such as JSON and HTML. The MUnit Maven plugin also allows developers to partially skip tests if and when required. This partial execution functionality can be defined through command line parameters or POM configuration.
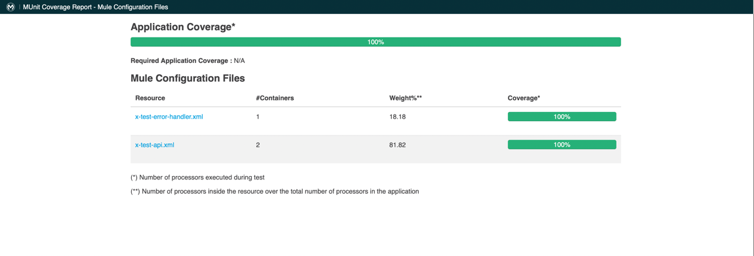
Figure 8 Munit coverage HTML report
You can also use this powerful functionality to define what percentage of test coverage is deemed successful – although overall, this level of advanced functionality is best used at the user's discretion, in alignment with MUnit best practices.
MUnit test suites & test case generation support
There are a wealth of ways in which MUnit unit testing tasks can be further enhanced using the capabilities this software offers.
Using Anypoint Studio, for example, blank test suites and test cases can be created. This feature also lets you further customize and enhance your test cases and suites according to your objective's requirements.
However, you're free to create your test suites and test cases in several ways, and we will explore these different workflows in more depth below.
MUnit skeleton test suite & test case creation support
An essential – yet still comprehensive – approach towards test suite generation is found in simply utilizing this feature to create a skeleton test suite and test cases, as required.
Click on the MUnit Test Generation Menu Item from the Project Context Menu. Select the Mule project, then right-click to get the Project Context Menu to pop up. From there, choose New, and from there, click MUnit Test.
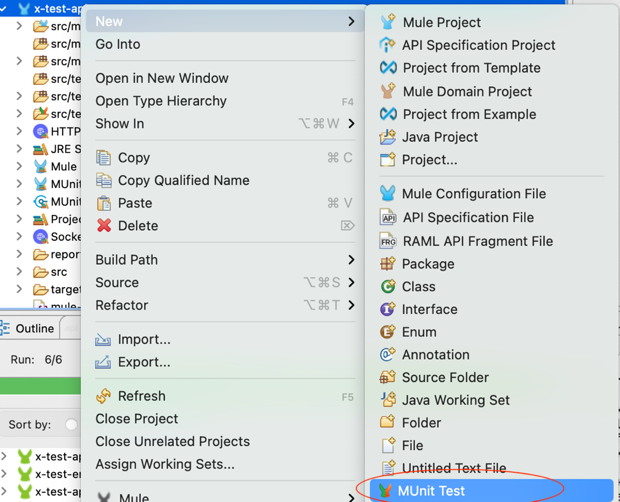
Figure 9 Create Munit test suites and tests
This opens the MUnit Test Suite Creation Wizard. From here, getting a skeleton test suit and a handful of test cases up and running in a few clicks is very easy.

Figure 10 Munit test suites and tests creation wizard
Use the Test Suite Creation Wizard to select the Mule flows for which MUnit flows you're planning to generate. Once you have everything in place, clicking Finish creates the MUnit test suites and test cases you've defined, ready for action.
If you don't need test cases for what you're working on, the Wizard can still help. Check the Create Empty Test box to create test suites alone – although you can also create test cases for each flow at the corresponding flow level if you need to. Remember that doing so means that the flow for which the test case needs to be generated can be defined using the corresponding Mule flow XML file.
Using the Mule Anypoint Studio Flow Editor, you can find the flow context menu by right-clicking the flow itself and finding MUnit in the dropdown menu. From there, click Create Blank Test to create an MUnit test for that specific flow.
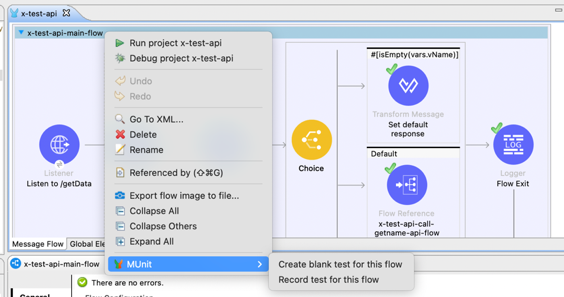
Figure 11 Munit test generation from flow
MUnit test recording
For developers who need to deploy some rudimentary functional testing within MUnit, the test recording feature is handy – and can be set up to deliver powerful results.
It's easy to set up too. Each flow's context menu lets you select the Record Test For This Flow option, at which point Anypoint Studio begins the flow so it can be recorded.
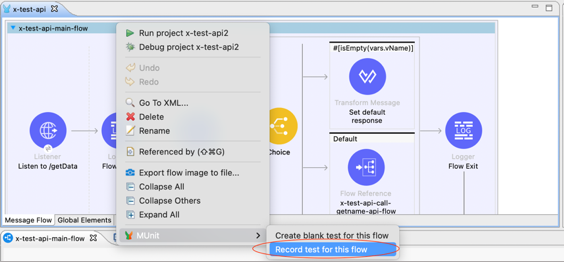
Figure 12 Initiate Munit recording of a flow
Once the recorder is active, you're free to add whatever input you need. This could be sophisticated or simple, like passing an HTTP endpoint listener using Postman.
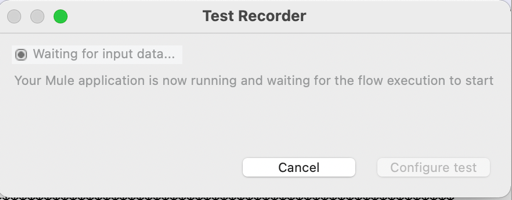
Figure 13 Test recorder modal window
When you've finished your input, the Configure Test button is activated, which makes the Recorded Test Configuration Wizard run to help guide you through the rest of the process.
On the first page of the Wizard, you can name both the test and the test suite. Following that, you can set up input and output assertions, which will default to the values obtained from the test recording unless you change them here.
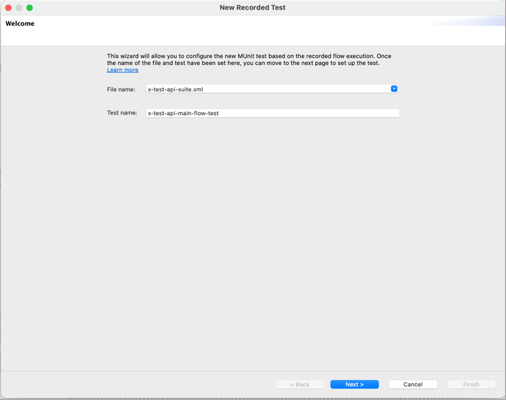
Figure 14 Test recorder configuration page 1
When you click Next, you can view a summary – and from there, finish by using your test recording to generate a test case. You can find that test case flow within the generated test suite.
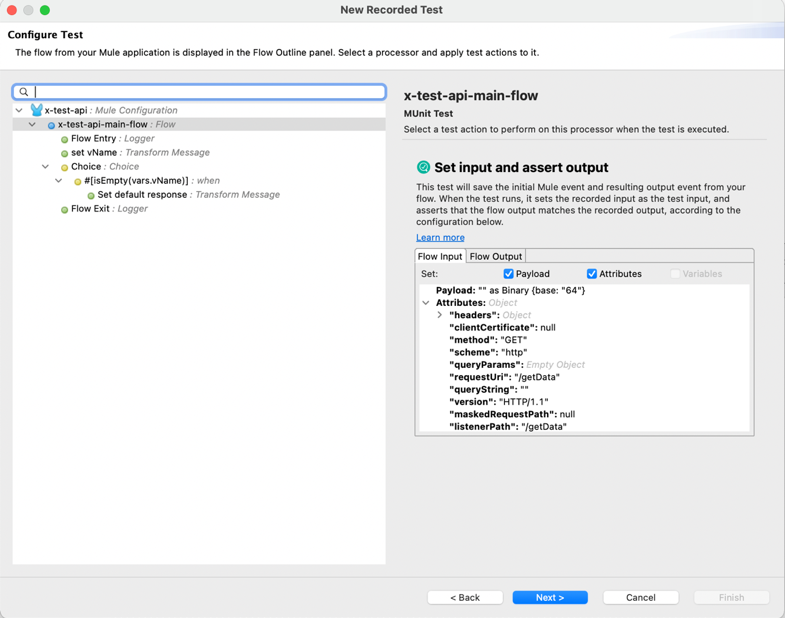
Figure 15 Test recorder configuration page 2 input tab
Exploring the tabs can help you understand what other options are available to you. For example, the Flow Output tab shows both attributes and the output payload.
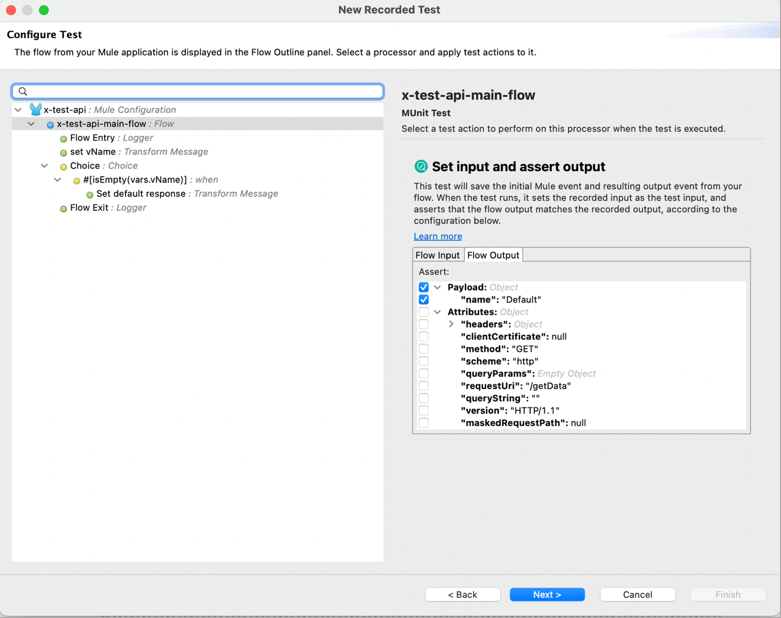
Figure 16 Test recorder configuration page 2 output tab
On clicking the “next” button, the test summary page is displayed.

Figure 17 Test recorder configuration page 2 output tab
On clicking the finish button, the test case generation using the test recording is completed. The generated test flow can be viewed by selecting same under the generated test suite.
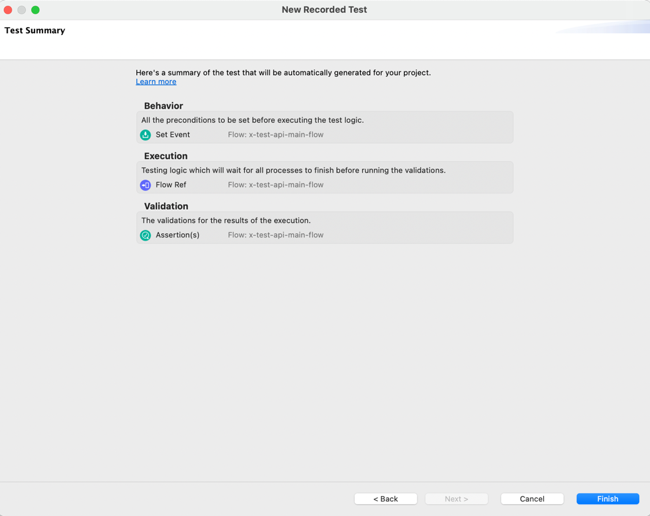
Figure 18 Generated test flow
As evident, the Input event is set from the input data recorded during the test.
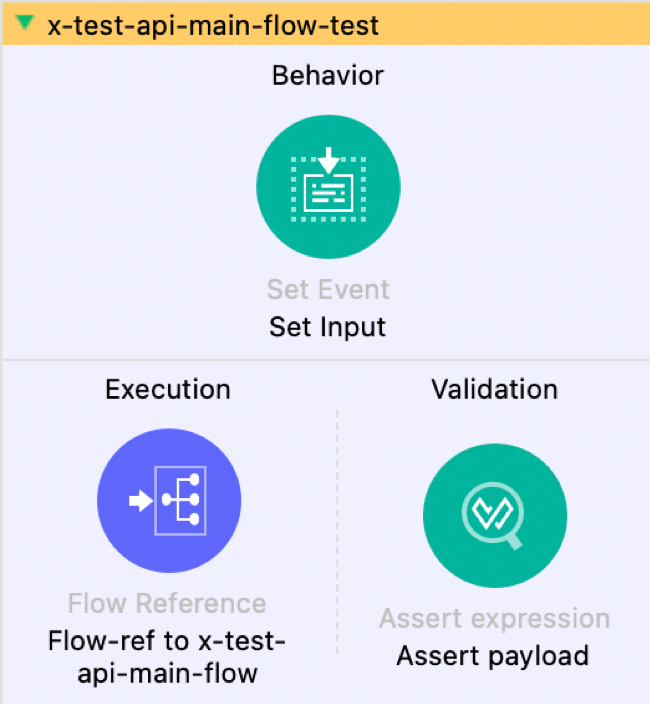
Figure 19 Generated test flow input payload
The DataWeave scripts are autogenerated to support the setup of input event.
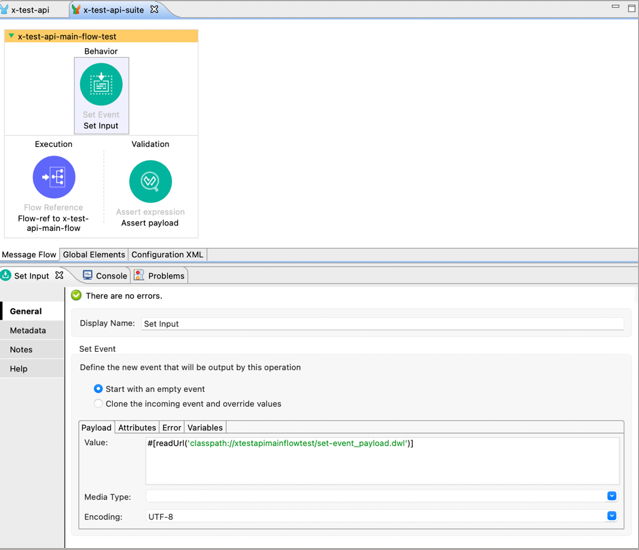
Figure 20 Generated test flow input event DataWeave
Figure 21 Generated test flow input payload DataWeave
The output assertion is also automatically configured as per the output recorded from the test recording.

Figure 22 Generated test flow output assertion
The output payload and other required assertion DataWeave scripts are also autogenerated.

Figure 23 Generated test flow output assertion dwl script
MUnit APIKit Scaffolding
You can use an API kit to create test cases using MUnit APIkit scaffolding quickly. Doing this means generating MUnit scaffolding by right-clicking the API kit router component and then choosing to Create Test Suite from the context menu.
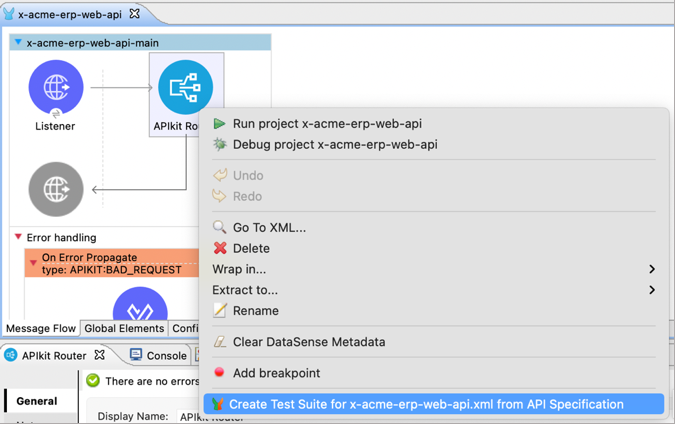
Figure 24 Generate scaffolding
A test suite is generated using the endpoints defined in the API kit router RAML. From here, you can continue working to define and fine-tune your work as you go forward.
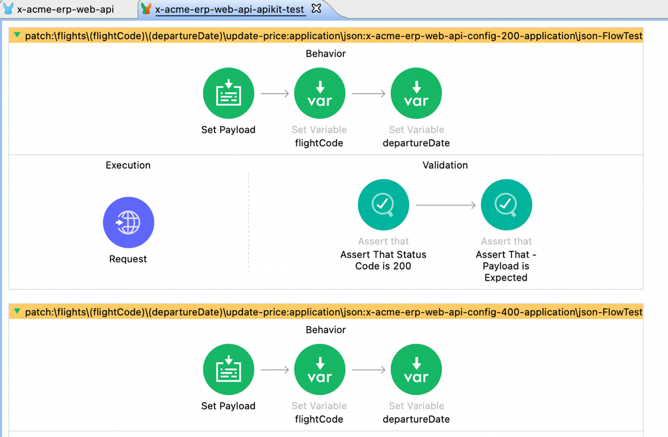
Figure 25 Generated test suite from APIkit
MUnit Parameterization
You can get full code coverage with fewer test flows using the nifty features of MUnit parameterization. Developers can effectively cover various logical flows without having to write dedicated test flows for each such logical flow. You can protect your entire flow with a single test case.
Using MUnit parameterization, different sets of parameters can be passed through test flows while being treated as environmental variables that best fit each scenario. In other words, each parameter set can have defined properties per scenario to ease flow execution.
You access your parameter properties the same way you would any other parameter variables, e.g. ( ${variable_name} or else Mule::p('variable_name') ) – and a single test flow is executed for multiple test scenarios, with the parameters taking care of what's required for each scenario.
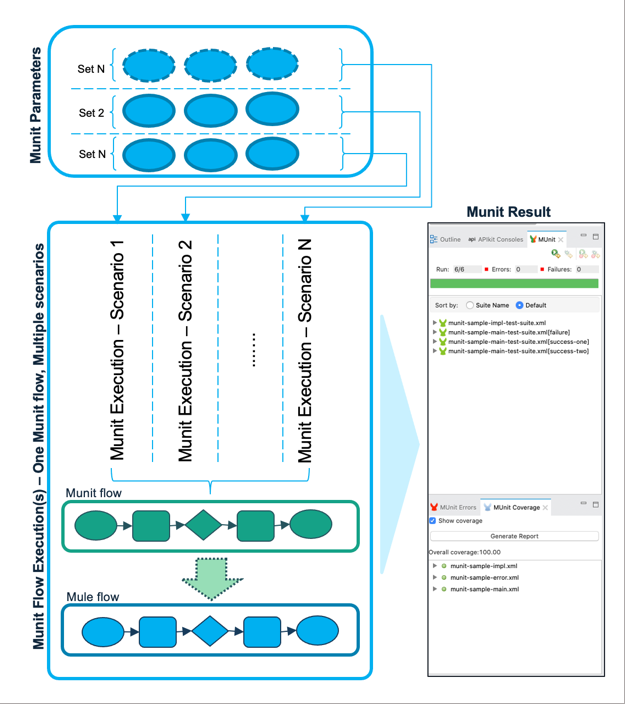
Figure 26 Munit parameterization
MUnit parameterization can streamline your testing workflow in several ways. For example, in a situation where you would ordinarily write three different MUnit test flows to cover various outcomes and ensure full code coverage, MUnit parameterization instead lets you use choice statements to streamline this into a single activity.
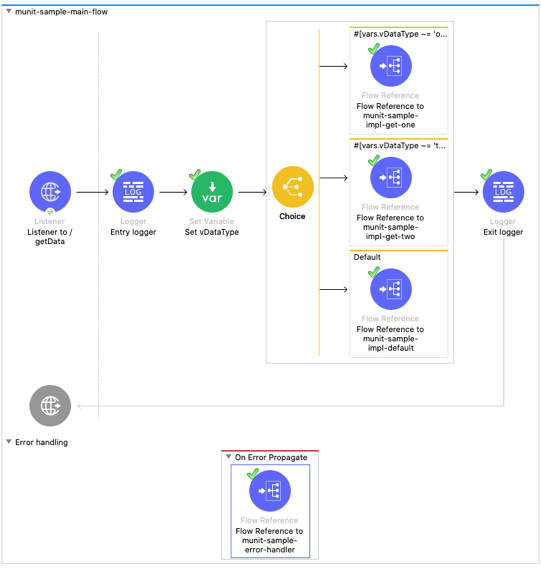
Figure 27 The sample flow
MUnit parameterization keeps the same clean interface as seen in the rest of Mule and MUnit, too – for instance, successful tests defined by the parameters we have discussed are distinguished by tick icons, so you can see what's working and what needs fine-tuning at a glance.
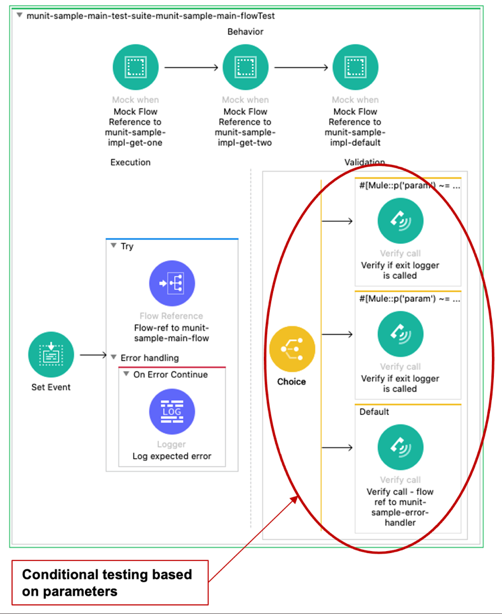
Figure 28 Example test flow with Munit parameterization
MUnit tips, tricks, and best practices
As with any software, MUnit benefits from quick tips and best practices to help developers squeeze every last drop of potential from what it can do. Similarly, keeping the advice discussed below close to hand will help you sidestep any issues or complications that could arise and enable you to enjoy a more organized and smooth working environment with the software.
While much of what we outline is common sense for experienced coders, it's always a good idea to stay on top of your game when bringing less familiar software into your day-to-day operations. Luckily, MUnit has been implicitly designed to be easy to use and satisfying to master – so you shouldn't experience any problems.
Are you looking to make the most out of MUnit and Mule? Here's our advice.
| # | Area | Context | Description |
|---|---|---|---|
| 1. | Test Scope | Test Suite identification | Within the scope of your development, identify all of the Mule flows you will be working with and the common and framework flows. Every flow XML directly involved in your developmental scope should have a test suite created for it – but you should also exclude common and framework POMs accordingly. Note: As with anything, following proper naming conventions when creating your MUnit unit testing files and systems is always a good idea. |
| 2. | Test Coverage | Specification of coverage | As a rule, each flow should have at least 80% coverage, and the test suite should have 70% coverage overall. The Maven POM should have this added to it, and you can use the sample POM for an example of what to do when configuring coverage rules. |
| 3. | Test Suite Design | Global test config file | A test config XML file with configurations specific to your testing should always be in place. MUnit tests must be independent of environment variables and the overall execution environment. |
| 4. | Test Suite Design | Self-contained tests | Config properties in the configuration XML file for externalized parameters, like encrypt. Key and mule.env should mean that your tests don't fail. Some developers prefer a config file per test suite, although this naturally involves some extra workload. Keep security in mind too; if you're using secrets especially, create unique configurations specifically for your MUnit testing and avoid any security best practices used in your wider organization. |
| 5. | Test Suite Design | Self-contained tests | MUnit unit tests ought to be stateless, isolated, and easily repeatable, making them utterly self-contained versus the rest of your programming work. In all cases where external dependencies are present (REST, HTTP, FTP, and so on), use mock tools to simulate them instead. |
| 6. | Test Suite Design | Identification of all scenarios (Both positive and negative) | Similarly, MUnit test cases for various logical branches must all be covered. Ensure the inputs and outputs are correctly identified but remember that DWL conditional statements are not covered as automatically as Choice statements. Manually review DWL scenarios as required. |
| 7. | Test Suite Design | Negative Test cases | Negative test scenarios must be given special attention and should not be ignored. Ensure that For all mocked components, include a negative test scenario if applicable, mocking the components expected error conditions. Ensure that negative test scenario inputs are identified (E.g., null) and passed, for sake of negative test case scenarios. |
| 8. | Test Suite Design | Parameterization | Remember also that MUnit parameterization can be a huge help if working to predict and account for every outcome and potential nested choice or DWL outcome is too complex to handle promptly. Normally such scenarios would require a dedicated Munit flow for each logical flow, but with parameterization we can ensure that all conditional logical flows are properly unit tested with single flow, resulting in as much of 80% savings in effort. |
| 9. | Test Case Design | Ensure that specific logical checks are in place | While writing Munit test cases, avoid generic pseudo checks, and use specific logical checks to verify if the flows behave properly or otherwise. 1. In case of choice and other conditional flows, use Munit tool component verifyCall to check if a component is called. 2. In case of Transformations, usage of Munit tool component Spy is highly recommended to record and verify the pre/post transformation. 3. Use specific assertions as dictated by logic and not generic assertions (E.g., Merely checking if Payload is not null, instead of checking for value of a specific field in payload) |
| 10. | Naming Conventions | Test Suite naming conventions | Ensure standard naming conventions. Every Test suite must have the name of the Mule flow config for which it was written, as prefix and 'test-suite' as suffix. The prefix and suffix should be separated with delimiter character '-' (It is assumed that test suite follows snake case) For example, for a flow xml called x-example-api-impl.xml, the corresponding test suite should be named x-example-api-impl-test-suite.xml |
| 11. | Naming Conventions | Test naming conventions | Ensure standard naming conventions. Every test flow must have the name of the flow for which it was written, as prefix and 'test' as suffix. Further if there are multiple scenarios (In cases where parameterization is not desirable) the naming should have scenario in between the 'flow name' prefix and 'test' suffix. For example, for a flow called check-postcode-flow, the corresponding testcase names, without usage of parameterization, could be as follows. 1. check-postcode-valid-postcode-test / check-postcode-positive-test 2. check-postcode-invalid-postcode-test / check-postcode-negative-test For same flow with parameterization, the testcase name could be check-postcode-test |