- 17-07-2020
- Coforge-Salesforce BU
- Anypoint Platform Mulesoft Mule ESB
-
Share


MUnit is a Mule application testing framework, used to generate unit tests for mule flows. MUnit is fully integrated with Anypoint Studio and provides multiple ways to generate MUnit tests; Manual (File Menu option and Mule Flow Context Menu option) and Automated (Test recorder).
With this blog we show you how to generate Automated MUnit using Test Recorder, the new feature of Anypoint Studio 7.5. The Test Recorder generates MUnit tests interactively by enabling you to record a mule flow and then configure a unit test based on the captured events.
Brief introduction to Anypoint Studio Test Recorder
The test recorder generates MUnit tests based on how the flow is executed, by collecting payload, attributes and variables in real time while the flow is executed. This gives developers the opportunity to generate MUnit tests based on the real data provided during the execution of the Mule flow. By capturing the flow execution, the Test Recorder can automatically generate an MUnit test with mocks and assertions for our test.
Required Software
- Anypoint Studio - 7.5.0 or later
- MUnit - 2.2.5
- MUnit Anypoint Studio Plugin - 2.5.0
- Mule runtime engine - 4.3.0
Note: The latest version of Anypoint Studio (7.5.1 as time of writing) comes with Mule runtime 4.3.0 and MUnit 2.2.5. There is no direct version upgrade from 7.4.0 or earlier version to 7.5.0 or later.
Steps to generate an MUnit test using the Test Recorder
As a common practise of writing an MUnit test, it should cover the complete code of the Mule flow. Let’s understand how to generate an MUnit test with complete code coverage using the Test Recorder with an example mule application. An example mule application asks for username and password, validates it and, based on the inputs it either displays the result as ‘logged successfully’ for the correct credentials, or asks to ‘Try again’. Refer to the appendix at the end of this blog to download the example mule application source.
1. Configuring the Test Recorder for the example Mule application
To generate an MUnit using the Test recorder, you must first select the mule flow of your application for which the MUnit needs to be generated, in Anypoint Studio. Right click on the flow and from the context menu, select MUnit > Record test for this flow. This action will build the mule project, run the mule application and prompt for the flow execution to start.
To start recording, now we need to invoke the example mule application by giving the required username and password.
To invoke the example mule application, open the browser and run the application with URL http://0.0.0.0:8081/login.
Enter the correct credentials and submit the page. The Mule application will be executed, and the test recorder will record the Mule flow for the specific credentials we provided.
The example Mule application contains a choice condition with two different cases for generating the MUnit; valid and invalid login credentials. The first condition would be executed when the correct credentials are provided, whereas in the case of incorrect credentials the second condition will be executed. As we are interested in the complete coverage of the mule flow, we will run and record the mule application two times; once with the correct credentials and once with the incorrect credentials so that the Test recorder can generate MUnit tests for both scenarios.
As soon as the mule application completes the execution, the recording will end and the Test recorder will prompt you to configure the test. Click on the ‘Configure test’ button and provide the Test name. MUnit tests would be created under this name.
How to configure the Flow Input and Flow Output
The ‘Configure Test’ window has two sections. The left section lists all the Mule processors encountered while executing our flow with the flow name selected by default. The right section allows you to select the test action to be performed when the test is executed, and it is divided into two parts:
- Flow Input
- Flow output
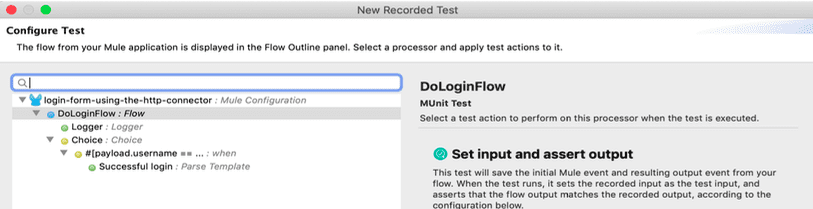
When the example mule application is executed, the Payload, Attributes and Variables elements are populated based on the request sent to the example mule application and you will need to select which one you want as part of your test. This is a critical step because based on the inputs selected at this stage, the respective data will become available as input to the MUnit test, under the <munit:behaviour> tag. E.g. if Payload is selected, it would be considered as a sample payload for the input to the MUnit test.
Validation
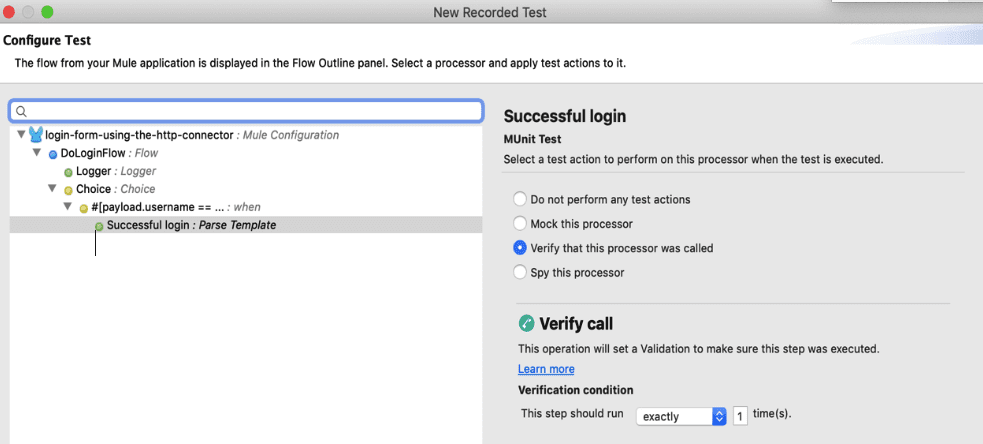
You can add an Assert statement based on the pre-populated payload from the Flow Output. In the flow execution, there are multiple mule processors involved and you can configure individual processors for the validation. Click on any individual processor on the left section of the Configure Test popup, and select the respective validation on the right. Based on the selected processor, the following validation options will be available:
- Do not perform any test actions – A default action
- Mock this processor – To mock the mule processor (e.g. HTTP Requester)
- Verify that this processor was called - To ensure the right processor was called
- Spy this processor – To test data before and after the event processor was called
The image below shows validation of ‘Verify Call’ on ‘Parse Template’ (a mule transformer processor).
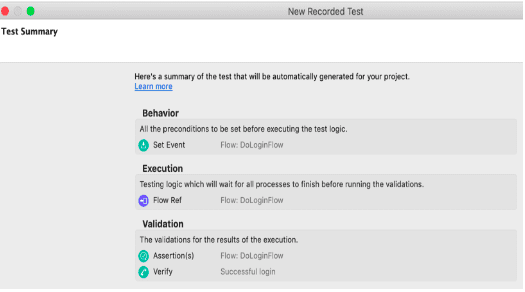
Test Summary
This is the last step before we generate MUnit Tests with the Test Recorder. The Test Summary page gives an overview of all your selections during the configuration of the Test Recorder.
The Test summary is divided into three sections:
- Behaviour - Preconditions before executing the test logic
- Execution – Name of Flow to be executed
- Validation – List of Assertions and verifications
Based on what we selected under Flow Input, Flow Output and validation, a summary is created to confirm our selection. At this stage, the Test Summary is available and if any change is required we can always go back and select the appropriate Test Configurations. Once all the Test configuration are finalised, click on Finish. This should generate a Test suite with the dependent files.
2. Understand the MUnit Tests generated by the Test Recorder
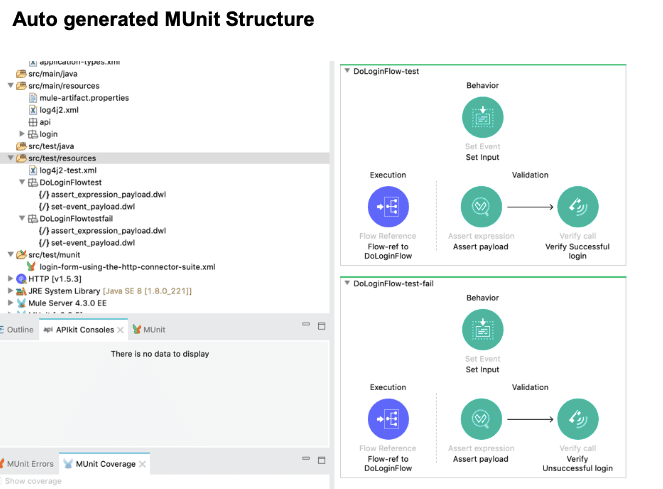
Once the Test recorder configuration is completed, the MUnit Test cases and respective files are generated into a mule project. They are organized as follows:
- MUnit Tests – All MUnit test cases are grouped into a single file with name: <project_name>-suite.xml under src/test/munit folder. The xml file contains all the MUnit tests which can be directly executed now to test the Mule flow.
- Test Data – Data which were given while running the Mule application are captured into a DataWeave file. Based on the elements (variable/payload/attributes) selected during the MUnit Test configuration, respective dataweave files are generated. E.g. If payload was selected during the Test Recorder configuration, the set-event_payload.dwl would be generated containing the payload (i.e. login credentials) provided at run time.
- Test Folders – To achieve complete coverage of mule application, the Test recorder needs to run with those specific test data. Every time you run the Test recorder; a Test folder is created based on the Test name given during the configuration stage.
An example mule application has two cases (i.e. valid and invalid credential), so two folders are created:
- DoLoginFlowTest is created when valid credentials are provided.
- DoLoginFlowtestfail is created when invalid credentials are provided.
Limitations of the Test Recorder
To see the limitations of generating MUnit test suites using the Test recorder, visit:https://docs.mulesoft.com/munit/2.2/test-recorder#limitations
Appendix
- Test Recorder in Studio: https://docs.mulesoft.com/munit/2.2/test-recorder
- Mule Example Application: https://anypoint.mulesoft.com/exchange/org.mule.examples/login-form-using-the-http-connector/
If you would like to find out more about how you can leverage API-led integration and Anypoint Platform to drive digital enablement and innovation, we can help. Give us a call or email us at Salesforce@coforge.com
Other useful links:
Recent webinars on Anypoint Platform
API Recipes with MuleSoft Anypoint Platform